Saturday, March 10, 2012

Portrait Categories

In light of the fact I gave my students a walk on the first day of extended ed class ... (uggghhh, clears throat) I thought I would post a brief note on types of portraits.

Constructionist is when you put subjects together mostly to get an emotional response. The classic idea is the family portrait, but this concept is HEAVILY used in advertising. The perfect example is the Marlboro Man. This one for "Boating" is a great example.


Environmental, the style I am most partial to, involves putting people in their environment. Senior portraits and newspaper photos are examples of environmental portraits. The emphasis is on placing the subject in their surroundings to give context.


Candid is the most widely known portrait style. Trouble is, it's also the most abused and poorly done. Candid portraits are photos taken of a subject without their knowledge or their being posed. They are also the most difficult to execute. One of my favorite is called "The Kiss at Hotel D'Ville" by Doisneau. Candids are also rock concert images. This one is popular on Pinterest currently.


The last category is Creative. Creative involves manipulating an image to get a desired result or fantastical effect. In normal terms ... It's Photoshopped! But the results can be some pretty amazing work. One of my favorite things to do is to do what I call a composite image of shots.


Saturday, December 24, 2011

Making Your Photography Better by Going Back to Basics

The last few weeks have been murder on me. I had to send my camera body back to the shop. I can't stand it. I feel like a crack junkie looking for his next score in an Amish community. But it has given me a lot of time to think about the essentials of photography and why it is so important to occasionally go back to the basics.
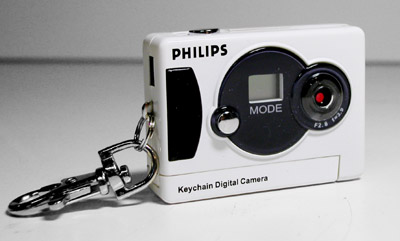
A few months ago, someone approached me about how to get bette

r as a photographer. I was flattered and after the initial shock of wondering why they were asking me, I thought about how I
had started with a basic point and shoot camera. I handed her a $10 compact point and shoot 1 MP key chain camera from Walgreens. I said, "Here, work on your composition and get to know the camera." I think that went over like a lead balloon.
The point I was trying to make was that it is not about the settings I could show you on her camera, rather, it was about getting to know how a camera functions and then seeing how to frame your subject. I keep going back to these two points over and over in my own work. I constantly am asking my self, "How did you frame that, did you get the depth of field and focus you wanted, what IS the subject of this photo?"

Let's start with composition, because you don't even have to have a camera to compose a photo, just a subject and something to record the image. For some odd reason our eyes are drawn to certain areas of a work of art. Usually, the upper right 3rd of anything. That's the rule of thirds.
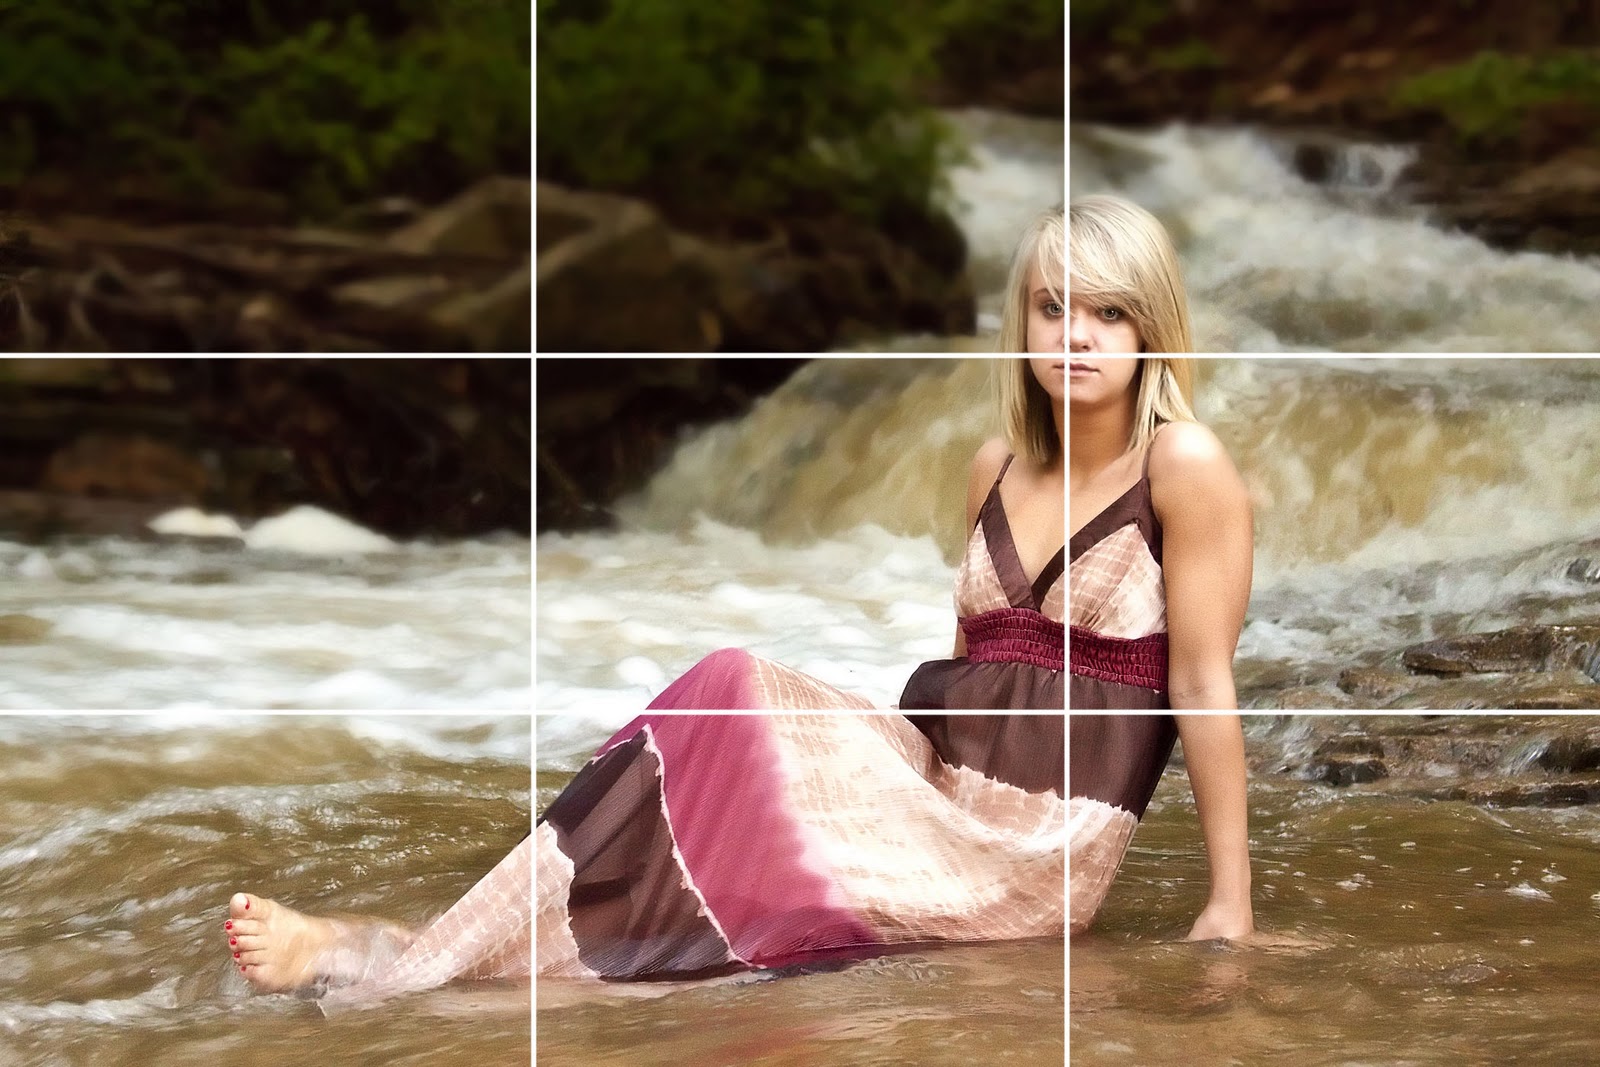
There is something spiritual about it. And I don't say that all hippie-ish. God is made up of the holy trinity (3 pieces), 3 is a number of balance, etc. The rule of thirds splits an image into 3 sections vertically and horizontally with the intersections being the "sweet spots" of an image. It's a big tic-tac-toe board. The intersection in the upper right is the most pleasing. I've rarely gone wrong placing the closest eye of my subject in that intersection. Sometimes it is not possible, but when it is, it looks great.

This also has to do with pe
rspective, or the angle you take a picture. Children should have their image taken at their height. It looks better. Perspective adds drama. It gives a sense of falling or looking up or the expanse of the sky.

So far, we haven't even talked about technical settings for a camera. We've talked about composition. From a technical perspective, a camera takes light through a lens or opening and focuses it on a plane for recording.

A lot of people like to talk about depth of field or DOF. DOF is the blur you get in a background and a good portion of it is controlled by the aperture of your camera. What a lot of people don't understand is that's only half the story. You can get good depth of field with a larger aperture. What, how is that possible?

Here's the other half they aren't telling you. The closer you get to a subject and focus the more blurry the background will become. Take any point and shoot or snapshot camera and get really close to your subject. Click. What happens to the background? Blurred ... huh, how did that happen. Optics. Point and shoot cameras are about one step up from a pinhole camera. They don't have an aperture per se. But when you understand that the closer you get to a subject, the blurrier the background will get, it opens up a huge door.
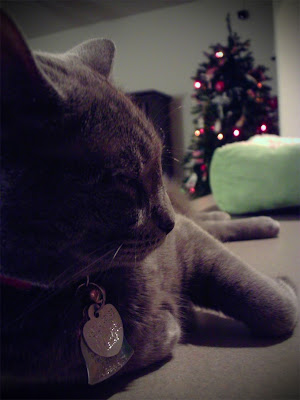
I took this this morning with my very limited point and shoot camera. My cat allowed me to get close and the tree blurred. One or two steps back and the tree would have been in focus. My cat was kind enough to let me get about a foot from her.

My camera's lens is 36mm-108mm and f2.8-4.8. Not stellar by any stretch. Rather common. But using the settings that it comes with gives me options.

Using what you have is also essential. As I stated, the point and shoot doesn't offer me the ability to change lenses. Or does it?

We got to go to Galveston this summer. Usually, it's a trip my wife, mother in law and nieces and daughter take. I was pressed into service. I wasn't going to take an expensive camera to the beach. I took an old point and shoot.

I had been reading about being able to take a door peep hole and hold it in front of the camera and get a fish-eye effect. I bought a $5 peephole at Home Depot and instantly doubled my choice of lenses. I figured I needed a good polarizing filter as well, so I found an old pair of plastic sunglasses from Marshall for $6 and I had a polarizing filter.

It turned out what I was doing was using my resources to get an effect you have to pay high dollar for in camera shops. For less than $15 I had 2 lenses (peephole and the built in lens) and a filter. It wasn't so much that I was a super genius as it was knowing how a camera functions and what makes a good picture.

Enjoy the holidays.


Sunday, August 21, 2011

For the New Photographer

I found these on Digital Photography School and thought I would re-post.


  1. What you see is not what you get.
  2. To get what you see you need to understand light. That takes a lot time, effort and patience.
  3. The best asset a photographer needs is anticipation and readiness to capture a moment.
  4. There is time and place for all gear.
  5. Some of the best photographs you see are not accidental. They are the end result of careful thinking and planning.
  6. Overcoming the inertia of using a DSLR is not enough. Always remember to keep learning and try for improvement.
  7. Possessing a DSLR doesn’t warrant you to be in manual mode always. Importance should be given to capturing the moment. Explore your creativity only if the situation permits.
  8. Even if you don’t realize it, most of the photographs you see online are post processed. Take time to master some techniques. It will pay off in the long run.
  9. Be gracious about your success rate. Only a few among the many photographs you have clicked will be useful.
  10. Costly gear does not necessarily equate to better photographs. Know your existing gear like the back of your hand.


Tuesday, May 24, 2011

Up and Coming


I've really been working hard to do a couple of things lately. First, building my portfolio of bridal portraits and second, getting ready to start teaching.

Bridal portraits are fun for me. And I really don't want to do the typical bridal stuff. One of the reasons my step-daughter "hired" me to do her senior pics was because I was different than the typical senior photographer. And I really appreciated that compliment. I told her I wasn't going to charge her because of that!

I think what makes any portrait great is that it's not typical. But that's also the hardest thing to do. I think Olan Mills revolutionized family portraiture, but at the same time, they really got us used to the mass produced-church-directory-photographer-in-the-box portraits. You just get tired of "sit on the stool, dad over here, mom right there holding junior." But again, that's the hardest thing to do is be creative, ESPECIALLY for someone like me who isn't an artist, isn't in tune with the artistic side, isn't at ALL interested in going to Starbucks drinking coffee then hanging out at the G3ni0us B@r at the @pple St0re.

So what kind of bridals am I looking at in the future? Goth! Yep, I had no idea that there are some people who don't want to wear a white wedding dress and would rather wear something like a vampiress getup to get married in. WONDERFUL! Love it!

And I'm also getting ready to start teaching photography. I'm excited and a little terrified. My wife is the teacher. She's phenomenal! Read her amazingly awesome blog. But I need to get out and start sharing. I truly believe in sharing in education. I also believe that as we get more advanced we should teach. I've been paired with some AMAZING photographers to develop a certification program in photography through extended education. What and honor. Scary! Surprising! I'm excited to teach my first class.

So what's on the horizon.

CHARITY! PRO BONO!

I've really been moved to do portraits for segments of the population who do not ever get to have a picture.

I'm a believer in Help Portrait a project to provide free portraits to the disadvantage. Always in December. I want to do something similar to this during the year. I have a special package for those who fit one of these characteristics.

  • On WIC
  • orphaned
  • on free and reduced lunch/breakfast
  • single mom with multiple (2+ kids)
  • I waive my sitting fee ($100) and they get a free CD with re-touched photos.
See you next time.

Wednesday, December 15, 2010

Workflows and Actions

I've been asked how I get my images to look the way I do. Most of it is in taking the image. It's easier to take an image correctly than it is to try to correct it. Get your white balance, ISO and exposure correct first. Get things the way you want and take the image.

Digital images if not simple snapshots look better processed. They often have a "haze" to them and the colors may not be rich. Processing or "workflow" is what you do to an image to clean it a little. It involves cropping, color correction, skin or item correction (think removing blemishes or leaves or anything distracting) and then any artistic additions.

Here is a video I did for the process.

Friday, December 3, 2010

The Advanced Rule of Thirds or The Fibonacci Ratio

We've spoken a little about the Rule of Thirds and how to use it to make your pictures look better. The rule of thirds, to re-state, says if you divide your image into thirds both horizontally and vertically, you will get 9 equal squares on your image. Placing a subject at the intersection of those lines is pleasing, specifically, the upper right zone is the most pleasing.

There is another rule or ratio that is pleasing to the eye. It's the "God Ratio" or Fibonacci Ratio/Spiral. Whether you are familiar with it or not, you have seen this spiral. The sea shell is an example of this spiral.

It's a spiral of specific proportion. Most people don't like math, so I won't get into it, but that spiral, when applied to a photograph is very pleasing.


Let's take this picture for example. It typifies both the rule of thirds and the Fibonacci Ratio.

When we overlay the Fibonacci Spiral as well as the Rule of thirds, we get the intersections at the subject's face.

What does this have to do with pictures?

When editing an image, try to do a couple of things. First, when shooting try to place the subject in an area of the frame that will accentuate one of the two rules.

Second, when editing, overlay the image with one of these two rules and try to place the subject at the critical points either in the grid or in the spiral. This creates a very pleasing image to your client as well as your art.

I found these images with a simple Google search.

Rule of Thirds
Fibonacci Spiral


Monday, September 13, 2010

Lots Going On

It's been a while since I posted. PBJ has moved into the Event photography and fund raising service.

It works out to be a really good deal for everyone. I take pictures and donate a portion of the proceeds to your organization. All you have to do is let me in to the venue and encourage people to buy digital downloads. Very simple.

Here is a composite photo I shot a few weeks ago for a senior portrait. I really enjoy doing these although the concept is sometimes really hard to get across.

Wednesday, June 16, 2010

New Location and Price Page

We've updated our prices to make it easier and more affordable for you. We've crunched the numbers ( read - we used Excel and asked the family accountant ) and come up with the best quality for the best prices.

Our packages are still only $100, $150 and $200, but ... here's the good part ... we've increased the number of prints you get per session.

General Session

$100 + location fees

  • 2 8x10's
  • 2 5x7's


Extended Session

$150 + location fees
  • 2 8 x 10's
  • 3 5 x 7's

Premier Session

$200 + location fees
  • 3 8 x 10's
  • 6 5 x 7's

Prints

  • 5x7's - $10
  • 8x10's - $15
  • 1 Sheet Wallets (24) - $15
  • Collage of Images (8x10) - $20
  • 11x14 - $30
  • 16x20 - $45
  • 16x24 - $60
  • 20x24 - $75

CD's

  • CD's - $20 each
    or
    2 CD's - $25 (CD comes with one letter of copyright)
  • CD comes with all approved shots from session
  • Replacement CD - $35 (replacements come with a replacement letter of copyright)


Locations

We've also added some pictures in our locations page with examples of some of the beautiful places we shoot. We get asked a lot about good places to shoot. Can't decide? We've also included pictures of actual customers at the locations. We still go other places, but these are some of the more popular venues.

Dallas Baptist University


Ft. Worth Botanic Gardens


Ft. Worth Stockyards
Gaylord Texan Resort ( Grapevine, Texas )

Kimbell Art Museum ( Ft. Worth, Texas )

River Legacy Park ( Arlington, Texas )


Texas Christian University ( Ft. Worth, Texas )

West End ( Dallas, Texas )

Friday, May 28, 2010

How Much Of What You See In Photography Is Real

I've been a PhotoShop expert ( and I use that term loosely ) longer than I have been a photographer ( and I REALLY use that term loosely).

I had an excellent teacher in one Conway Norwood. He introduced me to the wonders of PhotoShop and passed on some sage advice. His words were to the effect, "I can send you to PhotoShop class, but it will take you years to learn it all." He was absolutely correct. Eleven years later and I feel like I am scratching the surface of this tool.

After marrying my photography with PhotoShop, because, let's face it, I made a lot of mistakes and still do in photography, I learned PhotoShop is a handy tool for mopping up messes. I did make a commitment to not make any major changes to any client unless requested. I will remove zits and scars, whiten teeth and eyes and enhance, but not change, eye color. At the client's request I can remove tattoos or anything else, within reason, they wish, except ex-husbands or boyfriends.

The ethical dilemma comes to weight. When should I make someone a tad thinner? When do I need to modify the body so that the image is more appealing? I think the answer is to take the 10 pounds off the camera adds.

Take for example this photo. Is this the original?

The answer is yes and no. The client needed a picture of her daughter to turn in later in the year for another purpose. However, the original photo, is not this one. It's this one.

The ethical dilemma is not something as simple as a family portrait. No, the dilemma is what newspapers and magazines show you. Modifying the news is a heinous crime and some agencies have been caught doing it. Film was difficult to manipulate. Cropping was about the most you could effectively get away with. Digital opens new doors that may need to stay shut.

Outside of that, I did a good bit of PS work, if I do say so myself.

Sunday, February 21, 2010

Some Myths About Photography

I'm finding there are people who believe a few myths about photography.

1. The best light can only be found during the hour after sunrise and the hour before sunset.

Although the light at this time can be amazing, it's no reason to totally rule out shooting any time of day. Shoot, just shoot! With the right training and a few tricks you can turn the day to night and the night to day. Simply knowing that Shutter speed controls ambient (read, daylight if outside) and the aperture controls the light from your flash, you can adjust the settings on your camera to get some amazing results.


2. There's no good place to shoot besides indoors in the winter.

Nothing could be further from the truth in my opinion. So the trees aren't green, big deal. Move to a more urban setting/ Bricks don't ever fall off buildings. Well, they do, but don't shoot where they do.

Urban settings are great for winter photography. Shooting at night is also an option. I'm lucky enough to get some fairly decent days even in the dead of winter. It's cold in other parts of the country, but that shouldn't stop you.

I believe if you are good, and I'm working on it, you can really control the light in an image just by knowing and controlling your camera.

Friday, January 1, 2010

Sometimes It Works Out Better Than Expected

I was scheduled to shoot a session indoors on December 30th, 2009. However, a few minutes before I got to the location house, I got a text that basically was a profuse apology. My subject was apologizing for some unwelcome guests in her house that would have interfered with the shoot. So, as time was running out, we decided to just cancel what we had planned and do a shoot outdoors about a mile from her house at a local lake.

I don't generally like this location because it's a half finished lake. What?!?!?! Yes, when this lake was being built., there was a rather large rain storm that came and lasted for days as I am told. It rained so much there are still bulldozers at the bottom of the lake. So you can't water ski or really fish effectively. No scenery. It's really just a lake that people go to to hang out and build houses around.

But, I got some of the most amazing shots I have ever captured because we went with what we had. The light and my subject were AMAZING. I'm looking forward to doing other shoots with her.

Enjoy.


Friday, December 11, 2009

Group Picture Fun

I got the opportunity to shoot my company’s Christmas party Santa pictures. It' helps to have a great Santa and great subjects.


DSC_0253  DSC_0219 DSC_0226 DSC_0236 DSC_0245

DSC_0208

This is the only shot that needs an explanation. There was a choir at the luncheon so I asked this nice young lady to point at the camera. I had a wider angle lens; I wanted to distort the perspective. 

Saturday, December 5, 2009

Fun with clients - Amanda

I got to spend a very chili hour with a wonderful subject - Amanda.
We did a shoot at Joe Pool Lake outside The Oasis restaurant. Amanda was great, at 30 degrees she went shoe and coatless.


DSC_0121  DSC_0125

DSC_0137

DSC_0143 DSC_0075

DSC_0045 DSC_0061d

Wednesday, September 2, 2009

Five Mistakes People Make Taking Pictures

I know this is terribly earth shattering, but there are no perfect pictures. As a matter of fact the more you take pictures the more they seem to look imperfect. What's really happening is that your attention to detail is sharpening. I don't have a knack for detail in my life. I'm a bottom line kind of guy, which is not good if you do detail work. To increase my attention to detail I picked up photography. Among other reasons of course.

Today I wanted to share with you 5 common mistakes to try and avoid when taking pictures. There could be hundreds, but I'll focus on 5.

1. Avoid harsh light or mixed light if possible. In the picture below I shot this with a point and shoot digital camera. I didn't have my DSLR available. I made the error of shooting in partial sun and partial shade. Nary the two shall meet.

If shooting in this situation, try to shoot in all shade if possible. If you can't, move indoors or use something to shade the scene.

Bad shot

Better Shot


2. Shoot the subject. Almost goes without saying, but try to focus as much of what's in the frame on the subject. I see this less and less now that digital is all the rave. Old point and shoot cameras were hard to tell if you had the subject in frame so you backed up to get everything. Unfortunately, you got more living room wall than subject.

Correct this by getting close. If you are going to clip someone's face, clip the top of their head and not their chin. Fill THE FRAME!

Bad shot


Better Shot


3. Shoot from up high if possible. People look better when they don't look down. It has to do with their chin and neck. Most Americans have some weight. Avoid this problem if possible by having them look up. It stretches the neck up.

Bad shot

Better Shot


4. Get in line with the subject. Too many people shoot their children from their perspective. It loses something. Shoot children at their level. It actually helps you experience the picture as the child sees things and adds a level of interest.

Bad shot


Better shot


5. Straight on shots can get boring. Shooting the image in the same direction over and over bores the viewer. Change the angle at which you shoot. You can do this a number of way. My favorite is tilting the camera about 45 degrees.

Bad shot


Better Shot