Thursday, July 23, 2009

Rule of Thirds

I believe in sharing information about photography to my customers and those friends who read. Last time we looked at Depth of Field and how it relates to better pictures. This time, I want to focus on something that will make your pictures look much more artistic - the rule of thirds.

I have no clue why it's called a "rule" but it seems that we like a certain balance or imbalance in our images. We'll start by looking at a couple of images shot the way a good majority of people shoot images. ( thanks to my assistant and co-worker Lynn for helping me with these shots. )


You'll notice in this first shot that Lynn is centered in the image and fills the frame. Not bad. It's your typical, "Hey, let me take you picture for my scrapbook shot."


At this wider angle we see Lynn again centered in the frame. Not bad if you want to get the wall. ( We'll cover shooting the subject in another lesson.)

This is what a bazillion of your images look like in your photo albums I bet. Nothing wrong with them, but it's always the same shot with the subject in the middle.

The rule of thirds says ( from Wikipedia )

The rule of thirds is a compositional rule of thumb in visual arts such as painting, photography anddesign.[1] The rule states that an image should be imagined as divided into nine equal parts by two equally-spaced horizontal lines and two equally-spaced vertical lines, and that important compositional elements should be placed along these lines or their intersections.[2] Proponents of the technique claim that aligning a subject with these points creates more tension, energy and interest in the composition than simply centering the subject would.


This tension ads interest although I probably wouldn't call it tension. I'd rather call it interest from unbalance. Take a look at the shots below and see if you can notice a difference in interest.


Granted these aren't the most intersting portraits in the world, but they are more visually appealing.

How does this work?


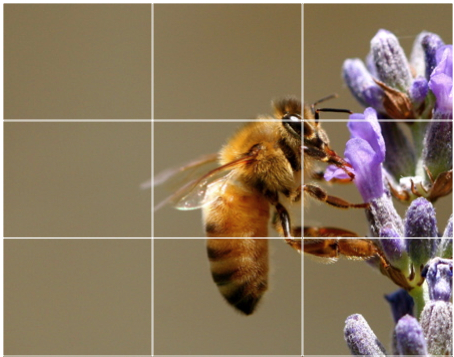
What we are trying to do first is divide the potential image up into 9 equal size boxes like in the image above. Then we try to place the subject - our subject is WHY we're taking the picture - on those lines. We can frame the image portrait or landscape.

When we line up a shot, we mentally have been programmed to put the subject in the middle of the shot. Our thought is, "Get the subject at all cost."

However, if you look at a good many portraits you will notice many of them the subject is on this rule of thirds. Below are some images from the internet with the lines in them to give you an idea of where the subject falls in the rule of thirds.


Wednesday, July 8, 2009

Depth of Field Tutorial

I'm not only hoping that you will look at this blog and gain a greater appreciation for my work, but that I'll also be able to share some secrets of the trade with you. On the surface that may seem counter productive. Giving trade secrets away, but I'm not giving you ALL my secrets.

For starters, we'll do a short series on making your everyday pictures better.

Ever wonder why a paid photographer's pictures look .... uhhh good? It's because they have a grasp on a lot of simple concepts and they put them together.

One of those techniqus is depth of field.

Last night I got the chance to shoot two images of the same person at the same time. The only difference between the two pictures was that I changed the depth of field (DOF) or "F-Stop", on my camera. Well, that and my subject is 6 and she moved between shots!

In this first image, you will notice that this picture looks a lot like many of the pictures you take at home. It was shot at an f-stop of 22, which means the little diaphragm in the camera was about the size of a pin hole. It let in very little light, BUT, it captured tons of detail BEHIND my subject. The DOF ( of view ) is very deep.

As a result my subject is competing with the objects behind her - the curb, the shrubs, the flag poles and buildings behind her.


Now, take a look at this image. It was shot with an f-stop of f4. A much lower f-stop, which means the little diaphragm thingy is wide open letting in as much light as it can on this camera with this lens. As a result, my subject is sharp, but my background is blurry. I've effectively isolated my subject, but given you an idea of where she is, but they are not competing for attention.


The result is an image focused on the subject and not the surrounding.

The trade offs ...

If I was wanting to shoot a landscape I would not want a shallow DOF. Also, if I have multiple subjects at differing distances from each other I would not want a shallow DOF. Also, because we are letting so much light in with the f-stop thingy, we have to let the shutter open on our camera a longer amount of time. If we leave the shutter open longer we are more prone to what I call "shake" which is nothing more than a blurry image.

This makes sports at night REALLY hard to shoot because you want to get the football player ( stop his action ) catching the pass 20 yards from the sideline ( deeper DOF ), BUT you don't want to have the visiting fans in focus ( shallow DOF ). Plus it's dark and you have to slow the shutter speed down to let in light, AND they are moving ... I'm getting a headache. But those guys are good at what they do.

So how do I get a shallow DOF with my little point and shoot?

A typical point and shoot camera will have something called a "portrait" mode and on the little selection wheel you will probably see something like a lady with a hat. That seems to be the universal symbol for portrait.

To set a shot up with a simple digital camera, set to portrait

  • Give yourself as much room behind the subject as possible ( if there is a wall behind the subject it will be in focus, things farther away will be blurry).
  • Get your subjects as close together as possible and fill the view finder with the subject.
  • Try to shoot with light that is not too harsh, but not too dark that it fires your flash. If possible shoot in the shade if its the middle of the day. A flash requires the camera fire at certain parameters which could change your DOF.
See? Easy